Soulz
Administrator

Posts : 22
Join date : 2008-05-09
Age : 30
Location : United States
 |  Subject: Map Making Tutorial Subject: Map Making Tutorial  6th November 2008, 7:52 pm 6th November 2008, 7:52 pm | |
| --------------------------------------------------------------------------------
PART I
-----------------
Installation
-----------------
Step 1.
Download and install GTKRadiant.
http://zerowing.idsoftware.com/files...iant-1.5.0.msi
Step 2.
Download the GunZ Online plugin for GtkRadiant
Mirror1: http://rapidshare.com/files/60960809/GtkRadiant_GunZ_gamesettings.zip.html
Mirror2: http://www.megaupload.com/?d=3NQSOX0H
Extract the files in the zip to C:\Program Files\GtkRadiant 1.5.0\ (Overwrite)
Step 3.
Download the basic config files for your gunz map:
Mirror1:http://rapidshare.com/files/60970384/GunZ_gamedata.zip.html
Mirror2:http://www.megaupload.com/?d=L66DNE98
Extract these files to C:\gunzmap\
Step 4.
http://sourceforge.net/projects/gzmap
Download Legions map compiler and extract the zip to
C:\Program Files\GtkRadiant 1.5.0\
Step 5.
Start GtkRadiant and select GunZ Online as your target game.
Set the Engine path to C:\gunzmap\
It should open a new window, once your in same immediantly. Call it the title of your map.
-----------------------
Configuring GtkRadiant
-----------------------
Before we get down to creating a new map, we need some textures to work with. I have a setup a download link for some basic GunZ textures that can be downloaded here:
http://files.filefront.com/datarar/;8744305;/fileinfo.html
Extract the folder in the textures.rar to C:\gunzmap\
Were not finished yet, when you add new textures you have to define them in a special file called shaderlist.txt located in C:\gunzmap\data\scripts the file should contain the following
Code:
textures
gunz
Alright lets get started, now that we've put in some custom textures we have to restart GtkRadiant so it can read the new textures. Open your map up and lets get started!
If you don't see this exactly, not to worry. Follow these steps to configure GTKRadiant to appear and operate like mine (which is, of course, superior to every other possible way). Go to edit, then preferences, and in the list, under Interface, click on layout. Set your layout as mine is... I prefer this to the other layouts for ease of use.
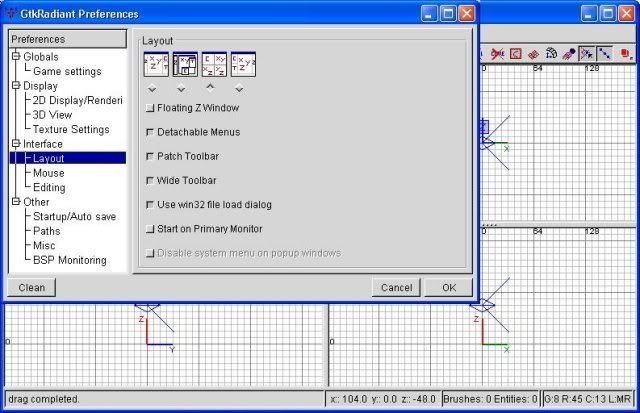
One final thing. Still inside the preferences, go to interface, then editing. Within this dialogue, we need to make sure that 'clipper tool uses caulk' is depressed. This button will cause the clipper (which we will get into in tutorial 3) always uses the caulk texture. What does that mean? Well, have a bit of patience, it will all be explained.
Edit-->preferences-->Settings-->Clipper
 PART II PART II
-----------------------
Creating your first map
-----------------------
Alright guys time to get started! In here we're going to begin building the room. This tutorial will cover creating the walls, floor and ceiling, as well as some very basic texturing.
Some useful commands to know before getting started
Code:
F1 - Brings up the help menu
Insert/Delete - Zooms in/out of a window
Escape - Deselects any selected brushes/entities
Shift-leftclick - This selects or deselects the brush/entity you click on
Numpad keys - Changes the grid size
ctrl-c - Copy the selected entity/brush
ctrl-v - Paste the previously copied entity/brush
t - Brings up the texture-picker.
ctrl-shift-leftclick - Selects just the face of a brush (one at a time)
ctrl-shift-alt-leftclick - Selects/Deselects the faces of a brush (as many as you want)
d / c -Move the camera vertically
Okay lets begin!
Now for the floor. Click and hold the mouse button at the -256,256 mark (top left of the window) and drag down to 256,-256. This should create a large square as depicted in the following picture.
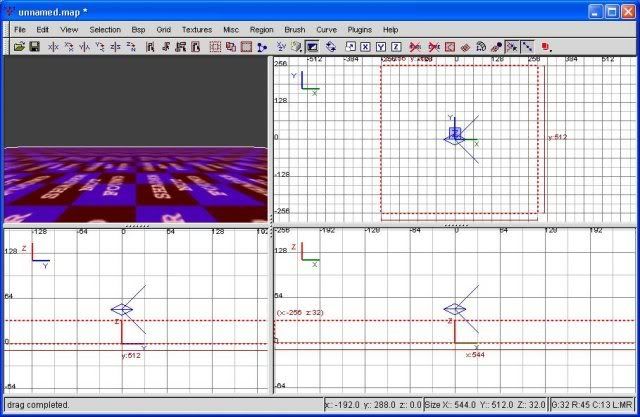
The Floor
Congratulations, you just created your first brush. What is a brush? A brush is a surface inside quake3 arena levels. Basically, everything we're going to do here will revolve around brushes or entities. We'll get into entities later, but just know that if I'm talking about a brush, I'm talking about THIS. Now that you know what a brush is, let's move it some.
Click and hold your mouse button in the center of the brush, in the bottom left window. This is a side view. You could also do it in the bottom right window, which is the front, as we're just going to drag the brush down a bit. Now, drag it so that the top of the brush is even with the 0 line. The following pic will illustrate what I mean.

Moving the floor down a step
Does it have to be at the 0 mark? No. However, we're putting it here for the purpose of demonstrating the movement of brushes (very important) as well as making it easier on ourselves later.
Okay before moving on lets set GunZ spawnpoints. It's important to set these locations otherwise your map will crash (duh) Before creating a spawnpoint we must de-select the current element (the floor) or else the spawnpoint will actually replace the floor, and we don't want that to happen. The below picture will give you an example how to add a spawnpoint:

Inserting a spawnpoint
Take a good look at that pink rectangular object, thats how big your gunz character is relative to the map.
Okay obviously we can see that our floor is too small lets stretch it out a bit but first we must select the floor again. De-select the spawnpoint by hold shift and clicking it, then click the floor it should highlight pink. If you look below you should be able to see the three dimensional panels and your selection should highlight red on them. To stretch an object in the x, y direction click and hold your mouse in the top right panel just above the box which is highlighted red and drag it, it should start to grow.

Stretching your floor
Okay lets texture it! just press "T" on your keyboard to bring up the textures menu and select any texture you want for your floor.
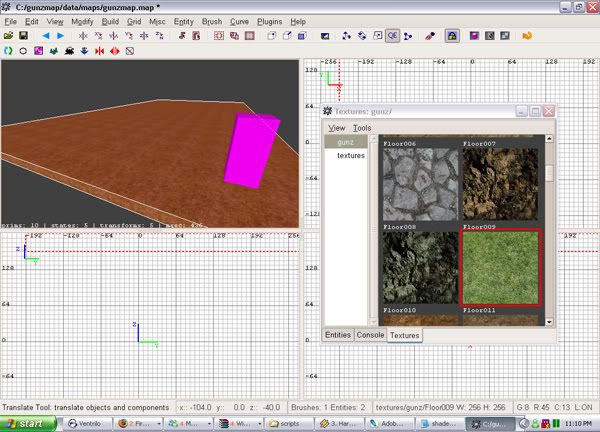
Floor
Alright its almost time for us to compile and test our map ^^
Next we have to create a large box around our plateform make sure its air tight, otherwise the map will have errors. It's like accidentally opening something up to the vacuum of space, everything gets sucked out.... Anyway you get the point all levels must be surrounded by some sort of a barrier.
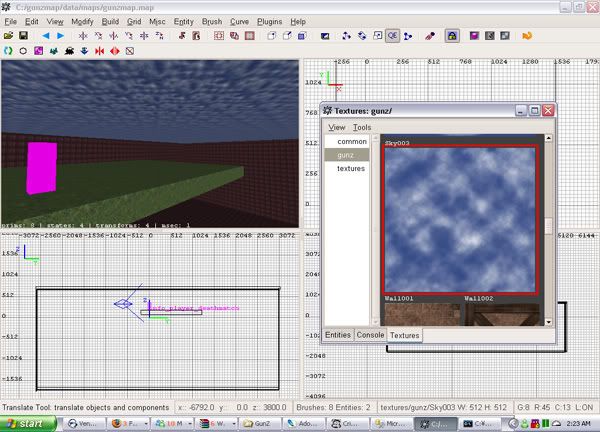
It doesn't matter what the outer barrier of your map looks like were going to make it invisible later on in the tutorial.So lets test it right now! goto the top and hit BUILD compile using NOLIGHT
Once its compiles check in C:\gunzmap\data\maps your looking for the zipped copy of gunzmap, your going to extract the following files and move them to C:\MRS\gunzmap
Code:
WinZIP:
gunz (folder)
gunzmap.RS.BSP
gunzmap.RS
gunzmap.RS.COL
gunzmap.RS.LM
gunzmap.RS.XML
spawn.xml
Now to get a visible sky working for your map we have to do a couple of manual editing. Your going to take your your Town.mrs file and decompress it and steal some sky animations :3
Code:
Town_obj_sky_daylight.elu.ani
Town_obj_sky_daylight.elu
Then place them in C:\MRS\gunzmap
now we want to open up gunzmap.RS.XML and add the following lines:
Add in
Code:
55267160891140097000000000000000.00000 00 0.0000000 0.0000000
0.0000000 0.0000000 0.0000000
Underneath add
Code:
< OBJECTLIST >
< OBJECT name="Town_obj_sky_daylight.elu" >
< /OBJECT >
< /OBJECTLIST >
Okay so great! We now have a sky above, but... we surrounded our entire map with giant walls! Not to worry theres a little tag that lets us make them go away ^^ add the following lines in gunzmap.RS.XML
Code:
1.00000000 1.00000000 1.00000000
1.00000000 1.00000000 1.00000000
1.00000000 1.00000000 1.00000000
gunz/Floor013.tga
1.00000000 1.00000000 1.00000000
1.00000000 1.00000000 1.00000000
1.00000000 1.00000000 1.00000000
gunz/Box009.tga
1.00000000 1.00000000 1.00000000
1.00000000 1.00000000 1.00000000
1.00000000 1.00000000 1.00000000
gunz/Sky003.tga
The UseOpacity tag lets our ceiling become almost invisible so we can see the sky animation ^^
Now to test your file! Compile gunzmap folder and put it in your maps directory.
Some Textures <3
http://rapidshare.com/files/28304429/GunzTextures.rar.html
http://files.filefront.com/gunzrar/;9471118;/fileinfo.html
http://files.filefront.com/Texturesrar/;9517490;/fileinfo.html
Download All Of Em For Max Textures. <3
Last edited by Soulz on 6th November 2008, 8:04 pm; edited 1 time in total | |
|
Ricky
SPGunZ Member

Posts : 38
Join date : 2008-10-29
 |  Subject: Re: Map Making Tutorial Subject: Re: Map Making Tutorial  6th November 2008, 7:53 pm 6th November 2008, 7:53 pm | |
| Very nice job, Think ive seen it somewhere else or maybe just looks similar.
Should sticky this tut xD | |
|
Mafia_JJ
Owner
Posts : 84
Join date : 2008-10-26
 |  Subject: Re: Map Making Tutorial Subject: Re: Map Making Tutorial  6th November 2008, 7:58 pm 6th November 2008, 7:58 pm | |
| Sweet tut but how do you make transparent walls etc and where can you get plugins? | |
|
raulh
Owner
Posts : 67
Join date : 2008-10-26
 |  Subject: Re: Map Making Tutorial Subject: Re: Map Making Tutorial  6th November 2008, 9:59 pm 6th November 2008, 9:59 pm | |
| trasnperant walls use the noshader thing, and umm give credits soulz this isn't your tut.. | |
|
Soulz
Administrator

Posts : 22
Join date : 2008-05-09
Age : 30
Location : United States
 |  Subject: Re: Map Making Tutorial Subject: Re: Map Making Tutorial  6th November 2008, 10:01 pm 6th November 2008, 10:01 pm | |
| Never said it was my TuT... But its a shared tut =) | |
|
Sponsored content
 |  Subject: Re: Map Making Tutorial Subject: Re: Map Making Tutorial  | |
| |
|

